Announcements


Chinook Woodturning Guild, Feb 2017

Kai Muenzer   

 Vessels with a Foot on the Rim          


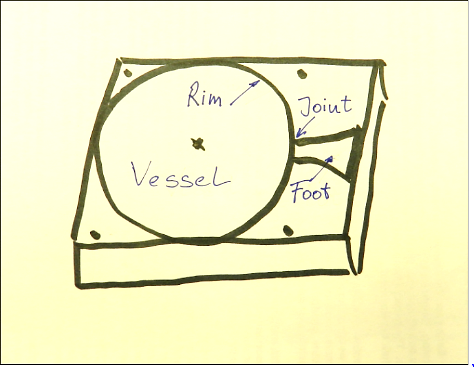
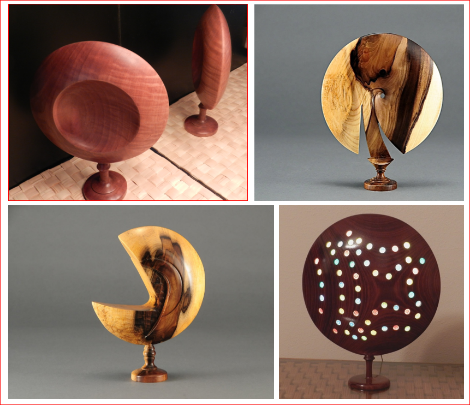
A foot on the rim allows for the vessel to stand on its side! All in one piece. This provides a lot of flexibility in the design of both sides of the vessel, as well as options for extensions at the rim - for example a foot. Although asymmetric and hollow forms are possible, there are ample design opportunities with symmetric vessels. Examples of practical applications are a standing lamp, a standing clock, picture frame or a hand-mirror.


In the demo we start with a fairly dry wood blank of rectangular shape of about 8”x 6”x 2 ½”. The thickness of the blank dictates the maximum diameter of the foot, the short side the maximum diameter of the vessel and the long side covers the diameter of the face and the total length of the foot. The grain is running along the long side to provide strength for the joint of foot to vessel. All angles should be 90 degrees and at least one of the faces should be flat. After the vessel is turned (cross grain) we use a band saw to trim the rim before we turn the foot parallel to the grain direction. Finally, we arrive with a sculpture of one piece that has been turned at three axes.


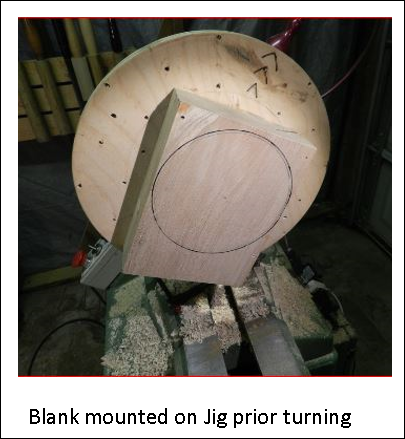
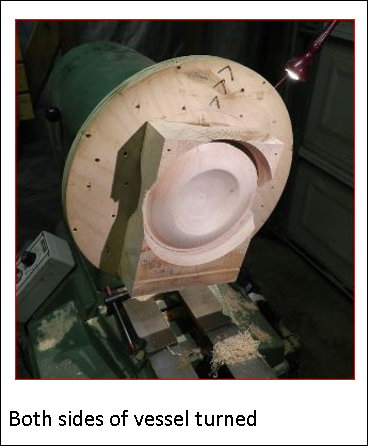
To turn the vessel sides, the wood is fixed by 4 screws on pre-drilled holes onto a slab (jig) that extends the dimensions of the wood. The rotational center of the vessel has to align with the axis of the lathe. For the jig in the demo we use ¾” plywood similar to the function of a faceplate with a diameter that extends the dimensions of the wood blank. The jig can either be fixed to a faceplate or mounted on to a jaw chuck. The jig allows reasonable rpm for turning, despite the eccentric mass of the blank. 

By rotating the mounted wood blank, we establish pencil lines to guide the turning with respect to shape of the vessel, its largest dimensions and for awareness of the location of the screws. Pencil lines along the side of the wood guide with the largest depth of the vessel, leaving a minimum allowance of the diameter for the joint. Turning techniques and tools are similar to turning a base and inside of a bowl. Note that the maximum diameter of the rim is the total widths of the blank, it is also a good diameter to shoot for as it allows a check for symmetry when turning the back side. This however requires turning some ‘air’ and accordingly steady hands and sharp tools.


A rim thickness that can support the foot may not be exceeded. This requires careful approach for the final rim cuts on both sides. We mark center and rim thickness for the foot along the sides of the blank. Consider the final intended shape of the rim -after sanding- and allow for a transition zone. We shoot for a straight line towards the edge of the rim and avoid curves, particular convex ones.


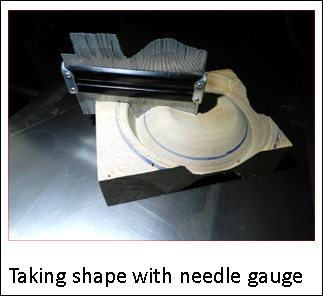
As both faces of the vessel are intended to be symmetric, the second face is turned without actually ‘seeing’ the first face. After finishing the initial face, we note radius and depth of high points and radius and depth of rim and any other features so they can be repeated. Cutting further is always a possibility later on, adding back on is not. We use several aides to memorize the shape of the ‘hidden side’ of the vessel, like a simple mask, that contain marks for center and rim and high points and a needle gauge. Once the shape of the first side is established the wood is flipped and fixed on the jig in precisely opposite position. Now we use the clues we gathered to mimic the shape of the opposite side.


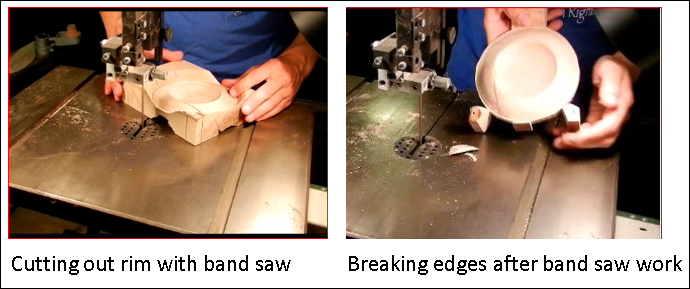
Before we cut out the waste wood on the outside with a band saw we mark the positions of contact for the in-between-center turning afterwards. The planar (flat) side of the wood blank allow for a good contact with the band saw table and safe sawing. Also the corners are sawn in a pie-shape to maximize stability in the sawing process. The tight radius requires blade with appropriate width. We cut out the vessel along the rim, sparing out the foot and some material necessary for the drive center mounting. Eventually we break off the corners.


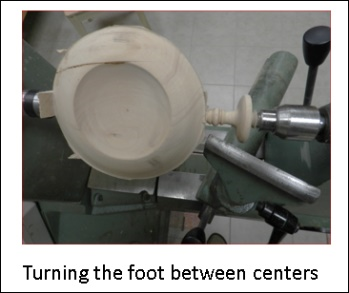
Now the foot can be turned in between centers using spindle turning techniques. We are limited however in moving tools and hands away from the overhang of the rotating vessel. The thickness of the wood establishes the largest diameter of the foot, particular of the surface area of the stand.


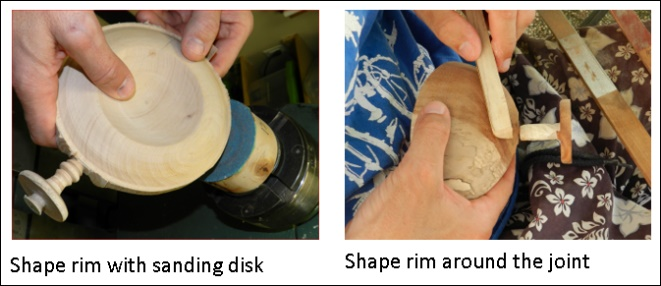
With the foot parted carefully, we provided the final shape the rim of the vessel with a rotating sanding disk mounted on the lathe, and in the vicinity of the joint with files and sanding sticks by hand. The shaping of the rim has to maintain the circular shape as well as to provide a smooth transition of the faces towards the edge. Touching the foot with the sand paper whilst sanding the rim has to be avoided.

There are a few turning challenges with regard to safety in addition to standard bowl turning and spindle turning the are explained in the demo. Eccentric masses are rotating on both the face turning as well as the spindle turning. Assuring free rotating of the blank without hitting the tool rest or your hands is critical before every switch-on of the lathe.  Maintain a safe distance from eccentric rotating mass by being aware or marking a 'never cross' line.  The demo will explain the challenges and show attitudes and techniques to reduces the risks.


 President Vern Miller Receives the 2016 AACE Individual Award

Our President, Vern Miller, has received the 2016 Lethbridge Allied Arts Council Awards of Excellence (AACE) in the Individual category on September 22, 2016 during the Mayor’s Luncheon for Business and the Arts held at the Lethbridge Lodge.  This very important recognition is for a member of the Lethbridge community who has made philanthropic contributions to an organization and therefore enhancing the entire arts community. Vern has been Treasurer of our Guild starting in 2008 and moved to the Presidency in 2011, position that he still holds at present, as well as newsletter Editor from 2009 until 2013. He has suggested and promoted the making of the Giant chess set by our members housed at the Galt Museum and Archives. He is an outstanding supporter of Lethbridge Arts Days celebrations, CASA Christmas Sales, Spring Guilds Sales and Allied Arts Council. He has managed numerous demonstrations and hands-on workshops for our Guild members and woodturners by world-class artists from across the US and Canada. He has promoted and pushed that the Chinook Woodturning Guild become the first group involved with Beads of Courage Canada and has contacted and challenged many woodturning and woodworking art groups across the country to join this unique program.  Vern has very generously shared is deep knowledge about the art and science of wood turned art and has led beginner workshops for members and nonmembers of the Guild to help turners to improve their technical skills and appreciate the artistic components of woodturning. Vern, as we all know, is a doer and wants things to happen.

To celebrate with and congratulate Vern for this prestigious award, fellow CWG members Dan Michener, Allan Schaaf, Dennis Delaney, Remie Benoit and André Laroche were present for the Award Ceremony.

Vern sincere congratulations!  All the members of our Guild and the Community have benefited from your numerous accomplishments. It was very nice that your efforts were recognized at the regional level.

Vern Miller’s award interview here:  Award Interview


President Vern Miller receives the 2016 AACE Individual Award from Lethbridge Mayor Chris Spearman


CINDY DROZDA DEMONSTRATION AND WORKSHOP

Dan Michener


The Chinook Woodturning Guild was lucky to have Cindy Drozda attend our workshop at CASA in Lethbridge on May 23-25, 2015. Cindy is a professional woodturner and is among the most accomplished and innovative woodturning artists working today.  Check out her website at www.cindydrozda.com for examples of her art and much more.

Twenty-eight woodturners showed up for the demonstration. Cindy introduced herself and her art with a slide show portraying the Colorado setting of her workshop, examples of her artwork and a tribute to partner, artist and woodturner David Nittmann, now deceased.

The first woodturning demonstration was of Cindy’s signature finial box. This included a discussion of form and proportion, supported by examples shown on a large screen. Discussion of types of tool steel and grinding wheels, along with a bit on tool sharpening worked in seamlessly as the finial box took shape. As lunchtime rolled around the completed finial box emerged, tiny and perfect. Great Timing!

The afternoon demo was a burl bowl.  Starting with a very cool description of burl anatomy, Cindy produced a small, beautifully figured asymmetric bowl, which she then stained and turned again, removing the surface but leaving the stain in the burl end grain where it penetrates, to achieve a magical effect.

At the end of the day the box and bowl, which Cindy had made, were auctioned off. Dennis Delaney agreed, after a bit of pressure and threatening, to be the auctioneer. He did a fine and entertaining job of it and both pieces sold for handsome prices.  Thank you to the bidders and buyers.

The following two days of Cindy Drozda’s visit were small hands-on workshops. Each day the seven or eight participants worked on their own finial boxes. In theory these were to be similar to the one Cindy had demonstrated the previous day, and for the most part, they were!

The workshop was organized into short sessions when Cindy would demonstrate a step in the project, after which we would go to our lathes and try to duplicate what we had seen. While we were at the lathes Cindy, in an impressive display of energy, enthusiasm and efficiency, never stopped moving from station to station to see what we were doing and to lend advice and encouragement. Participants in the class varied in their woodturning experience from none to 30 years, however, Cindy gave fair time to each one according to their needs. Everybody finished the project! A testament to great mentorship.

It is a great thing for a Guild as small as ours to get an artist and turner of the caliber of Cindy Drozda here in our workshop for three days teaching and demonstrating. Cindy never tired of answering questions, never brushed aside a query, never talked down to the less experienced. She said woodturners are a sharing bunch, and she is happy to share her knowledge and experience.  Every participant takes away things they can apply in their own workshop.

We attracted woodturners from Saskatchewan, Montana and other parts of Alberta to our Guild because Cindy Drozda was here. We appreciate that they went to the trouble and expense to come to Lethbridge and we hope they will come again and we can visit their clubs in the future.

Cindy spent the last evening with my wife and me. Not teaching, she could relax with Alberta beer and a bit of Australian wine and chat about cats, food and daily life. The following day as I drove her to the Calgary airport she talked about woodturning, not about technique and craftsmanship, but about woodturners as a community. Especially about how much woodturners depend on each other to share their craft so that they can all grow. Finally, she told me if I want to really pursue turning, I better start going to symposiums and meet the community.

Hmm, maybe I will.

Cindy Drozda demonstration class

The hands-on workshop, day two.

Lunch break on day two.

End of the day of the Sunday workshop class. Everyone made tiny finial boxes.

Left to right: Andre´Laroche, Jim Jones, David Stratton, Gord Rock, Cindy Drozda, Dan Michener,Dave Webster, Roger McMullin, Paul Omilon.

Conclusion of the Monday workshop. Left to right: Vern Miller, Remie Benoit, Richard Shelson,Cindy Drozda, Roger Wayman, John VandenBerg, Rino Cattapan, Dan Johnson.

Richard Shelson gets expert advice.

Dan Johnson concentrates.

Rino Cattapan and Cindy work together.

Remie Benoit refines a finial on his own lathe.

John VandenBerg makes the most delicate cut.

Vern Miller makes an adjustment.

Roger Wayman refines his finial.


Introducing Woodturning to Scouts

On Tuesday evening, 22 February, 2016, eight young men and three leaders from the Fairmont 45th Venture Crew of Scouts Canada were hosted at CASA by the Chinook Woodturning Guild. On hand to greet them from the Guild were Vern Miller, Andre´Laroche, Dennis Delaney and Dan Michener.

This came about because Randy Oliver, one of the Venture Crew leaders and the best optometrist in Lethbridge, while examining my eyes last autumn, mentioned that it would be great if the boys could get a woodturning demonstration to expose them to a new experience.  I said we could probably arrange that, and over the next while we came up with a possible program.

We decided on an evening in which I would give an introduction to woodturning, do a demo on making a spinning top and then have each boy get hands-on experience making their own top.  We thought 2 hours ought to be enough time.

I took away a few things from the evening that I will apply in future ventures with Venturers: Don’t spend much time introducing the general topic of woodturning and discussing items in the instant gallery. That stuff is great but leave it for the end if there is time. Introduce the lathe and get on with the demonstration. There is huge variation between the boys in how fast they can complete the hands-on work. Some have little experience with manual coordination or machines and they need the confidence to hold a tool securely and apply it to the wood, others are right there already, so its hard to predict how much time will be required.  No problem if there is extra time at the end because every completed top was immediately in a spin-off with another completed top while other boys were finishing up their own pieces.

My experience of dealing with young men is limited to – none, so I wasn’t sure what to expect. The boys also didn’t know what to expect so we were equally ignorant. In the end we all had a good time; the boys were willing, paid attention and, with a little coaching from their leaders and the woodturners, all completed a spinnable top. I hope they went home happy, I certainly did!

Dan Michener


Off-Centre Tool Handle

Dan Michener

This tool handle differs from the usual cylindrical shape in that it resists rolling off the workbench, is very comfortable to hold and sometimes attracts rude comments (“What went wrong there?”). I first made one of these by mistake. I was doing an exercise in turning a spiral when I confused the off-centre marks. The result, with modifications, wound up as my favored type of tool handle. Most of the shaping can be done with just a roughing gouge.

Figure 1

1. Select a piece of hardwood of a size appropriate to the tool to be handled. (I use 2”x2”x13”). Maple and ash are good hard woods, unlikely to split when being used.


2. Centre-punch the ends. Mark the punch marks with a pencil so you can easily tell them from other punch marks you will use later.

Round the piece between centers and take it down to 1 5/8”-1 7/8” . Use the larger size if you are going to mount something fairly robust, like a ½” gouge.  


3. With the lathe stopped, draw a line the length of the cylinder, using the tool rest as a guide.  (Figure 2).

Figure 2

Next, mark off 2” – 2.5” on each end of the spinning cylinder with a pencil. Then take the cylinder off the lathe. (Figure 3).

Figure 3

4. Decide which end you want as the “tool end” and which will be the “handle end”.  From here on I keep the “tool end” on the right. On the “tool end” centre-punch a point half way between the center and the end of the line along the cylinder. (Figure 4).

Figure 4

On the “handle end” mark the place at the end of the line along the cylinder, and then mark 2 points , each 1/3 of the way around from the first mark. The end of the cylinder will now have 3 equally spaced marks around the rim. Centre-punch points ½ way between the middle point and the two rim marks which do not line up with the horizontal line along the cylinder.  Mark numbers ‘1’ and ‘2’ on these two center-punched holes. It doesn’t matter which is which, so long as you can tell them apart when you are doing the turning. (Figure 5).

Figure 5

5. Put the cylinder back on the lathe with the “spur drive” in the #1 off-centre punch hole on the “handle end”, and the live center tailstock tip in the off-center punch in the “tool end”. The cylinder is now off-centre.

Be careful! You can’t see the edges of the wood while it spins off-centre and it is easy to have the tool rest closer than you think it is. Hand turn the piece before you turn on the power!

6. Turn the off-center cylinder, removing wood between the pencil lines, leaving 2”-2.5” on the ends. Cut away material, alternating between punch points ‘1’ and ‘2’ on the handle-end, leaving the turning piece somewhat fatter in the middle, until a  “fit”, pleasing to the hand and appropriate to the tool you want to mount, is achieved. I use a roughing gouge for this, but many tools will do just as good a job. (Figure 6).

Figure 6

It is hard to tell how much wood you are removing from the spinning, off-centre piece. To keep the cuts equally deep in the two off-centre positions you can stop and see how close you are cutting to the horizontal line you made in Step 3. Even up the handle by cutting each side about the same distance from that line.  (Figure 7).

Figure 7

Clean up with a scraper.

7. Using the center marks, reposition the handle on the lathe. Round the handle end; decorate if you wish. (Figure 8). Rounding and finishing the tool end can wait until the tool hole is drilled.

Figure 8

8. To drill a straight hole down the centre to accept the turning tool, remove the spur-drive, put in a drill chuck having a Morse taper. Seat the drill chuck well! I give it a couple of whacks on the end with a wooden mallet to ensure it won’t come out while drilling. Use a small drill bit to make the pilot hole. Bring up the tailstock until the off-centre handle is only just supported in the center punches, between the end of the drill bit and the live center on the tailstock. (Figure 9).

Mark the drill bit with tape for depth control and remove the tool rest so you have plenty of room.

Figure 9

Turn on the lathe at low rpms . While holding the wood with your hand to prevent it from turning, advance the quill, forcing the bit into the wood. Back out frequently to get rid of the shavings in the hole.

Figure 10

Repeat with a larger drill bit to make the hole the right size to take the tool or to accommodate a tool holding insert.

Remove the handle and take out the drill chuck.

9. Reverse the handle and reposition between centers. Use a cone shaped live centre in the tailstock to fit into the tool hole. Trim the “tool end” to fit a ferrule if you want to use one. Round off the shoulder. Clean up the handle with a gouge or scraper to get rid of the pencil lines and refine the thickness as you wish.

10. Sand; a drum sander works well. I use analine dyes to give the handles a distinctive appearance and I finish with sprayed on lacquer, usually 3 coats with a bit of sanding between. Mount your turning tool in epoxy, pound on the ferrule.

Figure 11

June, 2015

Picture Butte, Alberta,  This email address is being protected from spambots. You need JavaScript enabled to view it.


 If you are interested in joining the Guild or being on our email list or getting more information, contact a Guild member or come to a Chinook Woodturning Guild meeting.


Meetings are normally held at 7pm on the 3rd Thursday of the month, September - June at CASA Arts Centre 230 – 8 Street South Lethbridge, Alberta Canada T1J 5H2